TIPS & GUIDES
Easy DIY Range Hood Installation Guide for Wall Mount Range Hoods
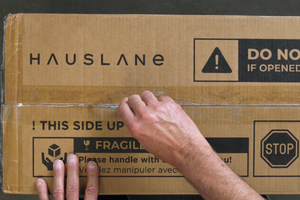
By Hauslane ∙ 5 mins readYou’ve studied your options, read the reviews, measured your space, and checked your options. And now, your new wall mount range hood is finally here! You’re so excited to start using it right away and can’t stop dreaming of all the new recipes you’ll try. But first, you need to install it. At the top of your list is learning how to vent a range hood through a wall.
Luckily, we have all the information you need to successfully install a range hood. You’ll learn why venting matters, the tools you need, and the steps to follow. Let’s dive right in so you can get to enjoying your new range hood.

Why use a vented Range Hood
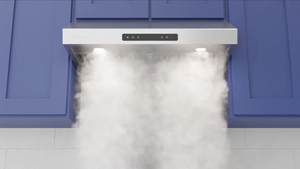
Range hoods are critical for getting rid of harmful, foul-smelling fumes, smoke, and odors from your kitchen. What makes a vented range hood different from an unvented range hood? Good question.
Here’s the deal: when you use your stove cooktop and oven, you release a lot of those fumes and gases we talked about. This is especially true if you have a gas range. Cooking fumes can be hazardous because they have over 200 harmful gases and include 2 chemical compounds (which are known carcinogens). Plus, they smell up your house.
Vented range hoods make all the difference. They remove all of that smoke, odor, and steam by circulating it outside your home. So, instead of just blowing that air and grease around, they take it outside. To ensure the best performance and better air quality, you’ll need to vent your range hood before use. Hauslane can help show you how to vent a range hood through a wall.
Carbon dioxide is normally found in the air, however, higher levels have been known to kill spiders and flies. It is unknown as to what the long-term effects of cooking and increased levels of carbon dioxide can do to the body.
What You Need to Vent a Range Hood Through a Wall
Don't jump into vent hood installation unprepared. You’ll need these tools and supplies for the job:

✦ The range hood and manual
✦ Measuring tape
✦ Level
✦ Utility knife
✦ Pencil
✦ Aluminum or duct tape
✦ Adjustable wrench
✦ Phillips screwdriver
✦ Self-tapping screws
✦ PVC trim*
✦ Silicone adhesive*
✦ Angle grinder*
✦ Ductwork (check the manual to determine necessary size and shape)
✦ Wall cap
✦ Clear exterior caulk (roofing grade)
✦ Needle nose pliers
✦ Hole saw
✦ Electric drill
✦ Safety goggles
✦ Safety gloves
*=only necessary if creating mounting plate
Steps on How To Vent a Range Hood Through a Wall
First things first. Before you can get to work installing a range hood, you need to turn off the electricity that powers the kitchen for safety. Make sure your work area is clear of any clutter or debris.

✦ Step 1: Open the range hood package and organize the parts
First, open the range hood package if you haven’t already. Take out all of the parts and double-check that you have everything. Set aside the packaging.

✦ Step 2: Mark the screw hole and draw the vertical line
Take a pencil and your level. Draw a vertical line on the supporting wall all the way up to the ceiling at the center of where the range hood will go. If you can’t get up to the ceiling, just go up as high as you can go.
✦ Step 3: Draw the horizontal line
Next, draw a horizontal line at least 24 inches or at most 30 inches above your cooking surface. If you have a gas range, you’ll need 30 inches of distance.
Then, take your chimney bracket and place it on the wall about 1 inch from your ceiling or the upper limit. Make sure it aligns with your vertical line.
Please check with your local building codes as it varies from city to city.

✦ Step 4: Determine where the ductwork will run on the interior wall
Next, you'll need to install the ventilation duct. Here's how to install a kitchen ventilation duct step by step:
1. Find the closest exterior wall and run the ductwork behind the ceiling or soffit
2.Run the ductwork as close to the ceiling as possible (leaving the ductwork exposed for an industrial look or building a soffit to hide it)3.Run the ductwork in the attic/wall through the roof
We’ll explain how to run the ductwork through the ceiling to the nearest exterior wall below.

✦ Step 5: Make a hole for the ducting
Make a hole slightly larger than the ducting for your vent on the ceiling to run the duct through the ceiling / soffit. A hole saw is an excellent tool to create an even, perfectly-spaced opening. Remove all of the material inside so you can run the duct in the joist-bay. Note: do not remove any joist as that might compromise the integrity of the building structure. If you cannot run the ductwork in the joist-bay, we recommend running the ductwork exposed or through the ductwork in the attic / wall through the roof.
Once complete, you can make another hole on the outside of the house (exterior wall). The location of the hole should connect to the joist-bay where you will run the duct.

✦ Step 6: Prepare the wall cap and make it watertight if necessary
Take the wall cap and fit it into the hole on the outside of the house to prepare it for mounting. If the hood does not fit tightly against the wall, you can use PVC trim to provide an even surface for the wall cap so it sits well on the exterior wall. This will help to make the hole watertight.
✦ Step 7: Make the mounting plate
Cut the PVC trim to match the size and shape of the wall cap. Then, cut a hole in the PVC trim that is the same size as the duct hole. This will be your mounting plate.

✦ Step 8: Inset and attach the mounting plate
Lay the PVC trim over the hole in the outside wall and mark its perimeter with a pencil. Then remove that section of the exterior siding with an angle grinder.
Apply silicone adhesive around the hole in the wall. Then, firmly inset the PVC trim. Attach it with screws and apply caulking or watertight materials around the PVC trim.
✦ Step 9: Attach ductwork to vent cap
Ok, it’s time to move onto the ductwork. Use aluminum tape to attach the 6-in diameter duct to your wall cap.
✦ Step 10: Secure vent cap to the mounting plate and wall
From the outside, insert the vent cap into the hole along with the 6” duct. Use self-tapping screws to attach it. Apply caulking or watertight materials around the wall cap to make it watertight.
✦ Step 11: Attach any elbows
Head inside, and use aluminum tape to attach the elbow to the 6” duct ran from the outside. Firmly slide the elbow (if needed) into the fitting. Use aluminum or duct tape to secure it to the wall.
✦ Step 12: Screw in mounting brackets
Screw the vent hood’s mounting brackets into the kitchen wall and wall studs

✦ Step 13: Install the mounting hood
Line the hood up with the mounting brackets and screw it in with the screws driven into the wall studs. Attach the ductwork on top of the outlet adapter. Tape all the joints on the ductwork to ensure the proper connections using aluminium tape.
For the rest of the vent hood installation, follow your manual’s steps. You’re well on your way to enjoying a brand new cooking experience! Stay tuned to the Hauslane blog for even more tips and tricks.
To learn more about installing range hoods, get in touch with Hauslane today.
Please check out our installation videos.
✦ Hauslane WM 530 Range Hood Step by Step Installation
✦ Hauslane PS38 Raneghood Step by Step Installation Tutorial
Related Posts